Showing posts with label Tech Tip. Show all posts

Thursday, October 20, 2016

D2L Tip - Previewing a Student's Grades


From Thommen's Timely Technology Tip

After setting up or altering a gradebook, instructors often wish to view the grade listing from the student’s perspective. D2L provides this capability. 

1. Click the Grades tab. 

2. Click the Enter Grades link in the Grades Area box (upper left). A list of the student names as hot links appears in the User List window. 

3. Click on the name of the student you want to preview, and the Grade User summary screen will appear. 

4. Click on the Preview link in the upper left portion of the page. A new window will open displaying a summary of the student’s grade information. This window provides an accurate representation of what the students see when they review their grades.

For more D2L tips, contact Meg Elias at clarkm1@star.lcc.edu or stop by the CTE in TLC 324 during our open hours.

Friday, October 7, 2016

D2L Tip - Hiding Your Online Status

When students and instructors access the Classlist in D2L, a green circle to the right of a user's name indicates that the user is currently online.  If you wish to appear offline, you can hide that status in your account settings.

The account settings are found under your profile.


Log in to D2L, and click the down arrow beside your name in the top right corner.  Click Account Settings, and scroll down until you see the section, Signing In.

The choices under the Signing In menu are Appear online and Always appear offline.


Click Always appear offline.  Then click Save and Close.  your status will be hidden from all users in all courses.  You can elect to change your status back to Always appear online at any time.

For more D2L tips, contact Meg Elias at clarkm1@star.lcc.edu or stop by the CTE in TLC 324 during our open hours.

Monday, September 26, 2016

Teaching Tip: Using Alternate Text for Images

In higher education, there is an increasing expectation that students are able to access course content online, in the form of PowerPoint presentations, Word documents, and even original material added directly to the Course Management System.  When adding images to digital content, it is important to understand that students who require screen readers may be limited if alternative text (alt text) is not added.  Adding appropriately worded alternative text to an online image greatly improves the accessibility of your course content.   

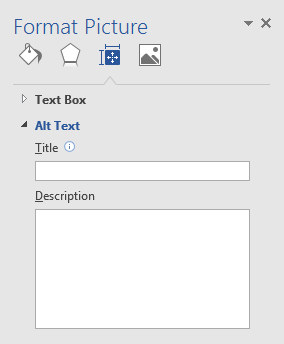
In Microsoft Office products, alt text can be added by clicking on the Format Picture menu.  Type a phrase or short sentence into the description window.

The Format Picture menu in Word has a box for title and a box for description.  

In D2L, when an image is added using the Insert Image icon, you will be prompted to add Alternative Text.  If the image doesn’t add any additional content, you can click, This image is decorative.
 In D2L the user is prompted to provide alternative text.
Your alt text should describe the relevant content that the picture conveys to a sighted person.  As an example, the alternative text for the screenshot on the left might read, “The Format Picture Menu in Microsoft Word has a window to type in a title and a description.”  It is not necessary to use phrases like, “A picture of…” at the start of your text.  


WebAIM has a great article on alt text, that can clarify the purpose and process, and help you decide on the best phrasing to use in different situations.  

Removing barriers to learning is an important concept to embrace in education.  If you would like to discuss more about Universal Design or share your thoughts over a cup of coffee, contact Meg Elias (clarkm1@email.lcc.edu) or visit the CTE in TLC Room 324.  If you have more in-depth questions about accessibility for deaf and/or hard-of-hearing students, or blind/visually impaired students, please contact the Center for Student Access at 517-483-1924.

Monday, May 2, 2016

Inside the Teaching Professor - Negotiating Feedback

by Tim Deines

In discussions of evaluation and assessment of writing and other academic work, feedback is held up as a nearly unimpeachable good. Writing teachers, for example, often use marginal and end comments to heavily supplement, if not replace entirely, traditional grammar correction. As long as the feedback is more or less immediate, we often assume, it is preferable to a grading regime that strictly quantifies the final product.

And yet, the translation from feedback to grade can be a difficult one for both student and teacher. As teachers, we’re often not sure if students read and practice the suggestions we make. We might imagine that a valuable exchange of insight and information is happening – especially in online environments – where none actually is. 

From the student point of view, if the student reads feedback, there may be a lack of understanding about how the feedback relates to the grade. Rubrics are one way of confronting this potential disconnect, but that sometimes just introduces one more variable into a messy, vague calculation.

Part of the problem is that today we tend to want to quantify everything that happens in the academy. But everyone knows that writing, for example, is not easily reducible to impersonal, objective numbers. 

In the April edition of “The Teaching Professor,” Cassandra O’Sullivan Sachar discusses all of these issues in a piece called “Making Feedback Matter.” Sachar offers three bits of information that may help writing teachers and others better manage the relationship between feedback and grades

Sachar’s first piece of advice is “separate the grade from the feedback.” The main reason to do this is to remove the stigma of the grade from the writer’s self-perception as a person capable of doing that work. “Many students hold negative perceptions of themselves as writers,” Sachar says. “Removing the threat of bad grades can build confidence and motivate students to complete the assignment” (1). Sachar has found that students respond more positively and productively to feedback when the grade is removed from the assessment criteria. For most of us, this approach cannot be applied to the course as a whole, but there may be wiggle-room inside a course to experiment. 

Sachar also recommends assigning grades “based on student effort and improvement.” The point here is to emphasize writing and thinking processes while placing less weight on the final product, as important as that may be. “I want them to think,” explains Sachar, “not just about the quality of the final product, but the journey to get there.” In this way, feedback is attached to process and product, as opposed to some ideal result students feel may never be attained. 

Finally, Sachar suggests requiring a quick follow-up assignment based on the feedback. This can take any number of forms, and should not be a major undertaking. When students are asked to put the feedback to work in their writing right away, it follows that they will take much more intrinsic interest in the feedback. 

Sachar does us the great service of taking feedback seriously. If we are to rely on such a method in the academy – in writing courses, certainly, but also across the curriculum – it would be a good idea to understand the limits of its effectiveness. 

The Teaching Professor includes summarized articles from various educational publications, as well as original articles from university and college instructors. If you are interested in viewing articles in this and/or other publications, contact Tim Deines at deinest@star.lcc.edu or stop by the CTE, TLC 324. 

Reference: Sachar, Cassandra O. “Making Feedback Matter.” The Teaching Professor 30.4 (2016): 1. Print.

Friday, April 8, 2016

Teaching Tip - Branching Scenarios in PowerPoint

by Meg Elias

I was asked recently about creating branching scenarios for online learning, where students make choices and are guided to different screens based on their answers. One fairly simple option is to build the scenario in PowerPoint, publish it in iSpring (available at the CTE), and then share it with students in D2L. The result is an interactive learning activity that can take the form of a role play or even a multiple choice quiz.

Process Outline
Step 1: Create a map of your scenario on paper. Planning is key, here, to save time later. Below is a sample plan for a simple branching presentation: 


Step 2: Create a PowerPoint containing the text from the scenario. In the example above, I would create: 
  • An introductory or title slide 
  • One slide with the scenario and the three answers 
  • One slide with the “Sorry” message 
  • One slide with the “That is correct” message 
  • One slide with the Perfect Policy Award 
Step 3: Add the “branching.” Right click on one of the “Answer” boxes and select Insert Hyperlink. Under the Link to panel, select Place in this Document, and select the slide that has the result that corresponds to that choice. For example, in the “Answer 1” box, create a link to the “Sorry” slide. 


Step 4: Save the presentation and publish it in iSpring as an HTML5 file, and upload it to D2L. Click the presentation below to see the finished product using the methods outlined above. 


CTE Staff are available to help with this process. Email Meg Elias at clarkm1@star.lcc.edu, or visit our technology room in TLC 324 for assistance.

Tuesday, March 29, 2016

Teaching Tip - Effective Use of Videos

by Leslie Johnson 

I recently participated in a Webinar led by Zac Woolfitt, a lecturer at Inholland University in The Netherlands, who has researched the effectiveness of using video in higher education. Based on his research, Woolfit made some recommendations that made a great deal of sense to me. 

First, he noted that videos should not be very long—10 minutes at the very most. Woolfitt believes that 3-5 or 5-7 minutes, depending on the topic, is optimal. Take much longer topics and break them up into smaller chunks that will keep students’ attention and allow them to easily digest the main point of each video. 

Woolfit especially promoted what he referred to as the “theory of constructive alignment.” Simply put, develop a clear student learning outcome for each video you make and connect some type of assessment to that video. He suggested that the main point of each video should become a question on an exam or quiz. 

However, he also suggested using other types of classroom assessment techniques to reinforce the content. For instance, instructors can have students teach the main point of an assigned video. In a hybrid or “flipped” classroom, break the students into pairs; assign each student a separate video and have them teach the main concept to their partner. In a purely online class, students can be assigned to summarize the video in a discussion forum. 

Woolfit advocated requiring students to ask a follow-up question about each video they watch. Whether it’s done as part of a discussion forum, through email, or during a face-to-face meeting, students can ask for clarification or more information and receive participation points. 

As far as production goes, Woolfit recommends trying to create most videos in just one take. Have a script prepared so that errors can be kept to a minimum. He also advises instructors to keep post-production editing to a minimum. Just like our face-to-face lectures, content (or how we present it) will probably need to be changed on an ongoing basis, so instructors don’t get a great deal of return on crafting perfect videos every time—and students certainly aren’t expecting videos every time. 

Finally, Woolfit recommends a variety of videos. Sometimes, you might want to do a simple screen capture; at others, you may want to record your PowerPoint slides with you speaking over them. For certain lessons, you may want to actually have yourself filmed presenting a lecture to a live audience. 

At LCC, instructors have several resources to help them produce class videos. Kaltura screen capture is available within Desire2Learn. You can create more complex and fully edit screen captures using iSpring and Camtasia, which are available in the CTE’s technology support room (TLC 324). Media Services also has a Podcasting suite, which allows for better quality sound and video capture. In the Teaching Technology Sandbox, faculty can have a lecture recorded as they deliver it to an actual class. 

Please feel free to stop by the CTE during open hours for assistance using Kaltura, iSpring, or Camtasia. If you are interested in using the Podcasting suite or the Teaching Technology Sandbox for Faculty, contact LCC’s Media Services.

Tuesday, March 1, 2016

T5 - Customizing Widget Backgrounds in D2L

D2L has added a new feature to the Customize Widget Style dialog window.

About half-way down the dialog listing, there is a Widget Background section.  Its only control is a check box with the word Transparent next to it.

Checking this box makes the Widget Background transparent and greatly improves the appearance of widget-based banners and other items.  Previously, banner widgets were surrounded by a white border, which detracted from their appearance.  Setting the widget background to transparent eliminates the border and greatly improves the appearance of banners.

If you'd like to talk more about customizing your D2L site, visit the CTE or contact John Thommen at thommej@star.lcc.edu.

Thursday, February 11, 2016

Teaching Tip - Video Feedback for Students

For the last few semesters, I have required my Composition II students to complete a public writing project. Since their final work is published on the web, I couldn’t provide them with the type of feedback that I normally do using Microsoft Word: in-text comments throughout their essay and some narrative comments at the end. 

Since I still want to point out specific features within the text as well as provide some summary comments, I use Video Feedback—and I actually receive positive reviews from the students about the videos. The process is relatively quick and easy (once I got the hang of the technology), and it can be used by any instructor who wants to provide some personalized feedback on their students’ work. It doesn’t just have to be a writing assignment; it would work well for any type of digital submission required of students. 

Using Screen Capture, I use the mouse to indicate specific areas within the essay I want to discuss with my students. I simply move my cursor arrow around the general area, or highlight specific parts of the text while I tell the student what I want to say about his/her work. Then, I am able to move my cursor to the next section I wish to discuss. 


To create Video Feedback, you will need a computer equipped with a microphone and a simple Screen Capture program. I used Jing, a program available for FREE download. Now, Kaltura, an easy Screen Capture program, is already available within Desire2Learn (D2L). The advantage of Kaltura is that the video files are easily saved within the “My Media” area within D2L, which makes sharing those videos with students even simpler. As for a microphone, I recommend one of the external headset microphones; they make for much better sound quality. 

 Try these basic steps for giving Video Feedback: 
  1. Read and review student’s work first, taking notes on what you wish to say. Organize your thoughts a bit before you begin recording. 
  2. Call up the student’s work on your computer screen, then open Jing or Kaltura whichever you prefer. Set the screen capture area to record just the student’s work, not your entire computer screen. 
  3. Begin recording, making sure to talk slowly and clearly. Begin with some overall thoughts, especially something positive. Then spend time pointing out interesting ideas or possible areas for improvement. 
  4. If you need to discuss grammar/mechanics errors that overwhelm a student’s writing, do so in a general statement about the problem. Don’t try to point out each and every error; instead, choose one or two examples that are indicative of the patterns you are observing. 
  5. Keep the videos under five minutes. 
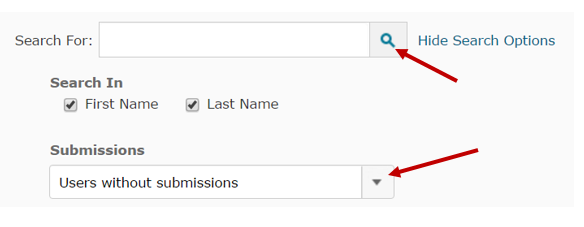
  6. Upload the videos to each student using a D2L dropbox. If the students did not submit the work to a dropbox, create one in D2L anyway. In the Folder Submissions view, select Users without submissions then click on the search icon; you will then be able to see all of the students, enter their grades, and upload the Video Feedback for each one. 

If you would like assistance getting started on providing Video Feedback to your students, email Leslie Johnson at farrisl@star.lcc.edu or stop by the CTE in TLC 324 during our open hours. 

Thursday, January 28, 2016

Tech Tip - Windows Snipping Tool

I use a lot of screen shots in emails to students, especially when I’m explaining how to use a piece of technology. Microsoft Windows has a very easy way to capture all or a portion of your visible screen and copy it to an email or save it to your hard drive. 

The Windows Snipping Tool is found under the Accessories Tab in the Start Menu. When you open the Tool, you can choose how much (and what shape) to snip. This is an advantage over the windows Print Screen (prt sc) button, which requires you to crop the image if you want anything less than the full screen. 


The following video gives a useful set of instructions for finding and using the Snipping Tool in Windows 7.


If you have another version of Windows, or you want to learn more tech tips, contact Meg Elias at clarkm1@star.lcc.edu or visit the CTE.